-Happy New Year 2015-


2014 has been a pretty nice year for us.
Thanks to all you lovely people for sharing it with me for the past few month since I started this blog. I hope the next year will be just as nice if not better. I will have no New Years resolutions for this upcoming year, because I never manage to keep them. I will however promise to do my best in everything that I do or try. I think that is all I can ask of myself. 
Have a safe, happy and healthy New Year.

May 2015 bring you everything you wish for!


-My New Die Cutter And Svg Cut File-

 
My hubby was so sweet and bought me an early Christmas present. The Cricut Explore Die Cutter.
I used to have a Cricut machine before, but I gave it to my daughter who just loves it and uses it a lot for her paper and decor crafting.

To be honest I wasn't all that impressed with the Cricut, mainly because you had to spend a fortune on their image cartridges and you were not allowed to make your own cut files or use third party software like Make The Cut or Sure Cuts A Lot. That put me off and I past the maschiene along to my daughter who was happy to get the cutter for free.
That was a few years ago and lately I've been seeing some nice projects that require a die cutter and found myself wanting a new one.

My first choice in my research was the Silhouette Cameo which has rave reviews and a large following, but then I started to run across the newest Cricut Explore and checked on how people liked it and the new improvements the company Provo Craft made.

I was impressed by the changes and the new freedom users were given in the creation of their own files and projects that I decided to give the Cricut brand another chance.
I've owned the Cricut Explore for about a week now and I must say I really like it. I'm still learning the software and how to create with Design space, but the difference from the older maschines to this one is like night and day and I'm glad I gave it a try.

This past week I've been learning the new Design Software for Cricut and relearning how to make my own cut files.

Below I have a set of 6 Snowflake cut files that I made, please download them if you have use for them.

These are in SVG format and for personal use only please!

https://app.box.com/s/7e6lggvb5pbxfak5mcxl


Thanks for looking


-"Glühwein" A German Mulled Wine Recipe-


Glühwein means roughly translated "glow-wine," and is very popular in German-speaking countries. It goes with Christmas like present wrapping and cookie baking. Glühwein is a traditional beverage that is offered during winter and the Christmas holidays including New Years Eve.

This drink is served hot and most of the time made from red wine. White wine can also be used, but is less popular than the red wine version.
The basic recipe for Glühwein is pretty much the same for most countries that enjoy this drink, but can differ in the preparation and adding of spices and other ingredients that make it more unique to a particular country or even families.

No German Christmas market is complete without Glühwein to keep away the winter chill.
It is a long standing tradition and while you can buy pre made bottles of Glühwein it will never be better than homemade.

To make a pot of Glühwein you will need:

- ¾ Liter Red Wine
- ¼ Liter Water
- 3-5 Cloves
- 2 Cinnamon Sticks
- 2 Star Anise
- 1 Lemon
- 1 Orange
- 3 Tbs Sugar

Pour wine and water into a pot and add all the spices. Slowly heat, but do not bring to a boil.
Cut the orange and lemon into slices and add to the pot as well. Leave on the stove for about an hour keeping the wine at a low simmer. After, strain the Glühwein to remove the spices and citrus. Add the sugar to taste and serve hot in large mugs. Place an orange or lemon slice into the mug for some decor.

If you like a bit more kick you can also add a shot of rum or brandy.

Enjoy and please drink responsibly


Thanks for looking


-" Vanillehörnchen" Homemade German Christmas Cookies-


Vanillehörnchen are my all-time favorite, traditional German Christmas cookies.
These cookies are quick and easy to bake. I'm sure they will become a family favorite and be gone in no time. Store the Vanillahörnchen in a tin, they will keep for about 3 weeks if you can keep your family from eating them in one sitting.


Ingredients for approx. 25 - 30 cookies

  • 260g (2 1/2 cups) plain flour, sifted
  • 2 tablespoons vanilla sugar
  • 100g (1/2 cup) ground almonds or hazel nuts
  • 1 egg yolk
  • 200g (1 cup) soft butter
  • 1 pinch of salt
  • 2 tablespoons icing sugar to dust the Vanillahörnchen
To make you own vanilla sugar
  • Put 200g sugar into a jar with a lid, slice one Vanilla Bean, remove the pulp with a small spoon and cut the bean into 2 or 3 pieces. Add the pulp and the vanilla bean pieces to the sugar. Close the jar and let the vanilla sugar rest for a few day, shake now and then. This sugar is so much better than store bought, with lots more aroma and taste.

Directions
Mix the butter, salt, vanilla sugar and egg yolk in a bowl with a hand mixer.
Add ground almonds and flour and knead to a firm dough. 
Divide the dough into quarters and form four rolls, each one about 2 to 3cm (0,78 zo 1,18 inch) thick. Cover the rolls with cling wrap and place them in the refrigerator for about an hour.
Dust your counter top with some flour and cut the rolls into slices (about as thick as a finger) and form little crescents.
Put the Vanillahörnchen on a greased or parchment paper lined baking sheet,
Bake at 160°C / 320°F in a pre-heated oven for 12 to 15 minutes.
Remove the Vanillahörnchen carefully and place them on a cooling rack.
Fill the icing sugar into a small bowl and dust the Vanillahörnchen while they are still warm.

Let the cookies cool completely on a cooling rack and enjoy with a nice cup of coffee or a glass of Glühwein.


Thank you for looking


-Filofax Layout {Week #6}-


Thanks for looking


-Happy 1st of Advent-


Happy 1st Advent. The Christmas season has begun and I decided to be less traditional with my Advents candles.
Every year I have used an Advents wreath, but this year I chose a powder blue tray that I filled with Epsom salt to simulate snow, added silver and light blue Christmas balls, some pine cones, greenery and then placed my 4 candles in the center. My tree is in white, silver and powder blue so this Advent display will go nicely with the decor.

A very simple but beautiful display fit to celebrate each Advent Sunday.
This afternoon we lit the first candle and sat around it with a nice cup of coffee and a piece of cake.
Sunday Afternoon coffee and cake has been a tradition in my family as long as I can remember, but sitting around the Advents wreath made it just a little more special.


I hope everyone has a great and joyous time during the Season. 


Thanks for looking


-Pinecone Ball-

Every year I promise myself to start early with crafting things for my Christmas decor, but it never works out or I just don't get around to it. This year however I managed to start a little something that goes great for the rest of  the fall season and carries right into Christmas.

I love pine cones and find them fitting for both of the major seasons.
Thanksgiving or Christmas, pine cones look great and so I tried my hand in making a pine cone ball. I've seen some displayed on Pinterest and thought they are just great so I just had to make one for myself.


I think I'll make some more decorations from pine cones since I still have a view weeks until the Christmas decor should be up.


Thank you for looking


-Raw Cotton Decor-


Every year when the cotton fields are blooming I go and pick some of the cotton to make decorations for the fall. There is something very whimsical and rustic about cotton bolls. I just love the look of it for decorating.
Raw cotton is also very fashionable for fall wedding decorations.

Below you can see a jar that I wrapped completely in cream colored  cotton string and then decorated it with burlap, a burlap flower and lace. This jar makes a perfect vase for a fluffy cotton bouquet freshly picked from the field.


I still had lots of cotton and managed to make a beautiful new wreath for my door. I also used some of the cotton pods to add as decor. A big burlap bow finishes the wreath of nicely.


These wreath are very simple to make. All there is to do is glue the cotton bolls to a Styrofoam wreath and add any other decor you might like. Such as bows, loops or floral items.


Thanks for looking


-How To Peel And Cut An Onion Without Crying-


I love onions and they are the backbone for many dishes I love as well, but peeling and chopping onions is something I really don't care for.

There are many tips and tricks on how to prevent the crying while doing the onion cutting. Some are a little wacky, but why is it that we have to cry while chopping onions in the first place?

"When we cut into an onion, we break its cells, releasing the contents inside. This allows chemicals that were previously separated by a cell membrane to combine with each other and with the air. Enzymes and “amino acid sulfoxide” chemicals from inside the cells react to produce a volatile sulfur gas. This gas wafts up from the onion and reacts with the natural water in your eye to form sulfuric acid, which brings about the familiar stinging sensation.
“One of the reasons we cry is to rinse harmful things such as dust and in this case acid out of our eyes, Pain receptors send a message to our tear ducts, prompting a flow of tears to dilute the acid."
                                                                                                                                BY Evan Conway

So what can we do to prevent the crying bit?

Some people seem to be more affected by the weepy fumes than others. So give the suggestions below a try and find the one that works best for you.

1. Keep your onions in the refrigerator or place your onion that is to be chopped for 15 minutes in the freezer. The cold slows down the release of the fumes that make you cry

2. Use a really sharp knife and try to cut the onion instead of chopping it. When you crush the onion which chopping really is, the chemicals in the onion will release faster.

3. Wear goggles. You will look a tad goofy, but who cares?

4. Put your chopping board next to the stove under the range hood and turn the fan on high, as to suck the fumes away from the air around you.

5. Cut the onion in half and dip it in salt or lemon water for a moment.
cut the onion in half and dip it briefly in salt water or lemon water.

Read More at <a href='http://www.eatwell101.com/peel-chop-onions-without-crying-chopping-onion-without-tears'>10 Ways to Peel and Cut Onions without Crying</a>,10 Ways to Peel and Cut Onions without Crying, Copyright © <a href='http://www.eatwell101.com'>Eatwell 101</a>

6. Chew on something like gum or a piece of bread.

7.  Using the natural acid of lemon juice or vinegar can help reduce the possibility of irritation. To give this method a try, just wipe down your knife with either and cut away!

8. Light a candle, this trick might be worth a try. Some people  say the gas released from the onion will be drawn to the flame. If this doesn't work at least you have a nice romantic mood in your kitchen.

9. Instead of cutting your onion into rings (against the grain) cut them into strips (with the grain), slicing from one end to the other. That disrupts fewer cell walls and releases fewer oils.

10. Have someone else cut the onion for you!

I hope one or more of these methods will keep you from crying and make the task of peeling and dicing onions a little bit easier and more enjoyable.

If you have a tip on how to cut onions please leave a comment.


Thanks for looking


-Folding Chair Makeover-

I've had this chair for such a long time and cannot remember how or when we got it. I thought I will try and bring it back to live again.

With a little fabric and paint it started to look nice and useful again. This project was a relative quick one and I love the result.


So here it is with it's back support missing, the wood is splattered with paint and is faded from exposure to sun.


The old seat canvas has been washed so it could be covered with new fabric. I wanted to reuse it, because it is very sturdy. The new cover will be cotton canvas which is really a paint drop cloth I bought at the hardware store.


The next thing left to do was sew a new back support. For a little bit of girly flair I added a nice crochet lace border.


Then the wooden chair parts have been sanded, primed and painted white. After the paint had dried the seat canvas was replaced and secured with the hardware.


Then all there was left to do was to put the back support on and the new pretty chair was ready. Well as you can see I should have ironed said back support first, but I was so excited about it to be finished that I forgot, but since it just slips of it will be easy to iron it.


Thanks for looking


-Fall Filofax Life Cards Set-

I managed somehow to catch a cold. I know it is Fall, but I really could have waited catching this miserable illness, especially when the weather is nice and the temperatures are still in the upper 80's.
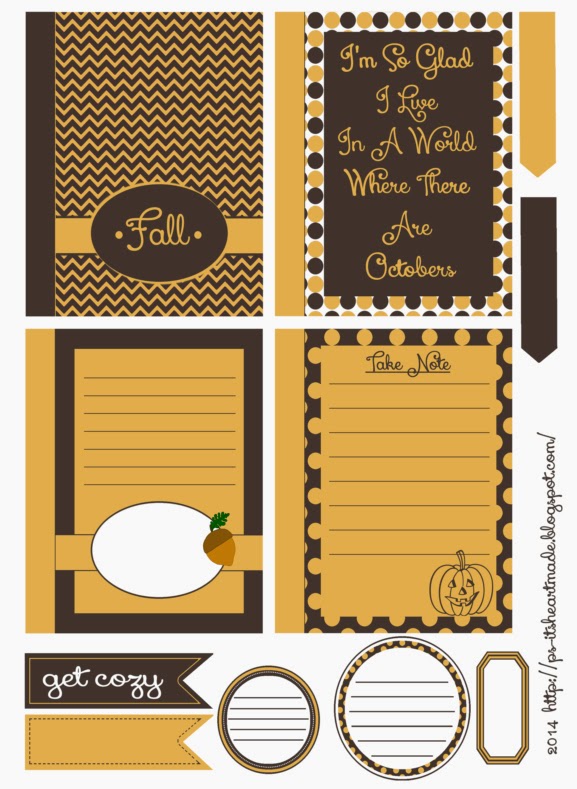
So while I'm trying to make myself feel better with tea and honey and watching reruns of Downton Abbey I spent most of my day drawing on my computer and came up with the Filofax Life Cards and journal elements below.

The set has 4 Filo Life Cards size 3.5x4.25. Each with a border so you can punch the holes for your planner without taking away from the writing space or design.
2 Banners, 2 journal circles, 2 arrows and a small button. Just cut them out place some re-positional adhesive on them and use to add to the decor of your Filofax Pages.

Open the file with your Adobe Reader to print and make sure you've ticked on print in Actual Size. This set was designed to print on a letter size 8.5x11 page. I use card stock to print mine. 

Note: Please enjoy this set for your personal use. If you download this file I would appreciate it if you follow my blog so you can see any new additions to my printables and so I can see if I'm not wasting my time creating them.


https://app.box.com/s/yfyi916gh4v2dkm9jyqt

Thank you for looking


-German Cabbage Rolls-


Last night we had German Cabbage Rolls for dinner. 
This dish is so very German and one of my favorites. I grew up eating Cabbage Rolls on regular basis. We call them "Kohlrouladen." You see them made with a tomato sauce and rice added to the meat filling a lot, but in my family we preferred a brown gravy and the filling without rice. 
So that is the way I learned to make them and how I will share the recipe with you.
The number of rolls you get will of course depend on the size of your cabbage head and the amount of filling you make.

This is an easy recipe to follow and I'm sure you will love this dish as it is very tasty and satisfying.
Cabbage Rolls are low carb and fit right in with your diet if need be.


German Cabbage Rolls Recipe

Ingredients:
- 1 medium to large head of cabbage
- 1 lb ground lean beef or ground turkey
- 1 large egg
- 1 small onion, chopped
- 1/2 cup bread crumbs
-  salt
-  pepper
- 2 tbsp oil and 2 tbsp butter
- 2 cups beef broth
- 1 - 2 tbsp corn starch

toothpicks or cooking thread for securing cabbage leafs

Instructions:
Prepare cabbage head by removing the stalk. Cook head in a large pot of boiling, salted water for about 5-10 minutes or until the leaves loosen. Remove leaves.
Prepare your meat filling by mixing together the beef ( turkey) egg, onion, breadcrumbs, salt and pepper.
Put some meat mixture on cabbage leafs. Roll up tight, tucking in sides. Fasten with a wooden toothpick or with some cooking thread.
In a large saucepan, over high heat, add oil and butter. Carefully brown cabbage rolls on all sides. When all have been browned add beef broth so that the liquid almost covers the rolls.
Simmer for about 1 hour.
Carefully remove cabbage rolls and set aside. Remember to remove the toothpicks. Keep rolls warm while you make the gravy.
Mix cornstarch with some water. Add to the liquid in the saucepan until it is the desired consistency of your gravy. Season with salt and pepper if needed.
Serve cabbage rolls with potatoes (salt potatoes or mashed)

Enjoy and thank you for looking


-Filofax Layout {Week #3}-

Follow my blog with Bloglovin

This week I picked the color mint as primary color for my layout.


Thank you for looking


-Oh my word.... We canceled Cable!-

Our weekend was relatively uneventful and lazy.
We lounged and bummed around watching our favorite shows. A week ago we talked about and decided to cancel cable.
It just didn't make sense anymore to pay a fortune for channels we never watch and reruns of shows we have seen many times before. There are just a couple of shows I could watch over and over again, but to pay close to $100 for them just didn't seem right. So we just canceled and now we watch movies and shows through Amazon Prime and online.

I've been a Prime Member with Amazon for several years now and I love it and since we would rent or buy movies from Amazon a lot anyways, it made more sense to pay a yearly membership fee of $100 instead that amount for a monthly subscription fee to cable.

I ordered the Amazon Fire TV box to be hooked to our TV until it gets here we just connect my laptop to the big screen and watch TV through it. We don't miss cable at all and save tons of money.
Amazon Fire TV combines all your favorite subscriptions and streaming services with Amazon's massive selection of digital content. Watch Netflix, HULU Plus, listen to music or play games
If you would like more info about Amazon TV check the link below.

I will have to do some research and maybe buy a old fashioned yet new TV antenna to receive the local and free channels, but we live in a small city in a rural area and I don't know how good the reception would be.


I think to get rid of cable was a good idea and with the money we save it can be put to better use.

Thanks for looking